# How To Create Task Auto Forward ?

{% hint style="success" %}

### **Download Mobile App or use Web**

✅ **iOS** → [App Store](https://apps.apple.com/us/app/autoforward-for-telegram/id6447486093)\
✅ **Android** → [Google Play](https://play.google.com/store/apps/details?id=com.autoforward.telegramforward)\
✅ **Web** → [web.autoforwardtelegram.com](https://web.autoforwardtelegram.com/)
{% endhint %}

### Step 1: Access the Forwarding List in Auto Forward Telegram Messages

To get started, follow these steps:

1. Open the **Auto Forward Telegram Messages** application.
2. Navigate to the **Forwarding List** screen.
3. Locate the **“Create Task +”** button.
4. Tap **“Create Task +”** to proceed to the next step.

✅ **Tip**: Ensure you have the necessary permissions to forward messages from your selected sources.

<figure><img src="https://blog.autoforwardtelegram.com/wp-content/uploads/2024/11/step_1_click_create_task_button-473x1024.png" alt="auto forward telegram create task" height="1024" width="473"><figcaption><p>
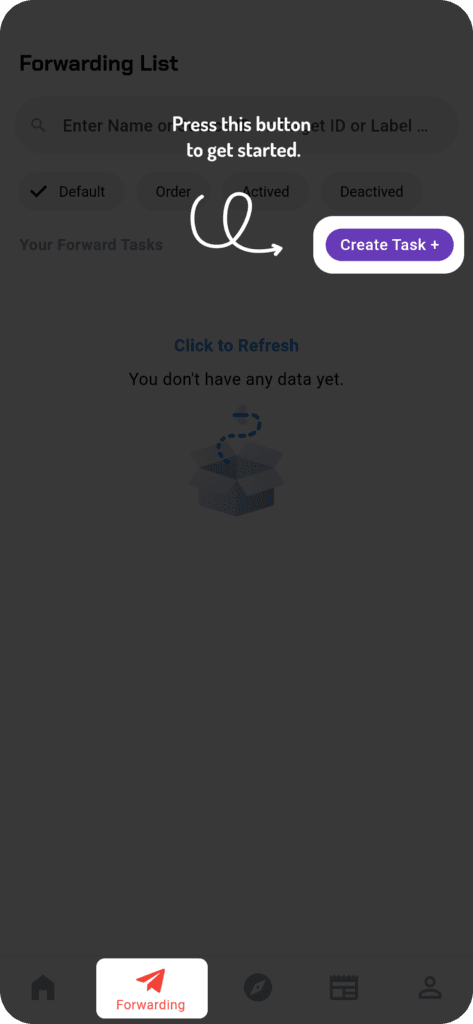
Start creating the task</p></figcaption></figure>

### Step 2: Choose the Source for Forwarding Messages in Telegram

After selecting **“Create Task +”**, you will be redirected to the **Select Source Forward** screen. You have five options:

* **All**: Displays all available message sources.
* **Channel**: Filters messages coming from specific channels.
* **Group**: Selects messages from groups you are part of.
* **User**: Includes messages from individual users.
* **Bot**: Filters messages from Telegram bots.

Selecting **“All”** will include a combination of the remaining four types.

<figure><img src="https://blog.autoforwardtelegram.com/wp-content/uploads/2024/11/5_types_of_chat_in_source_forwawrder-473x1024.png" alt="select source for auto forward telegram" height="1024" width="473"><figcaption><p>Selecting <strong>“All”</strong> will include a combination of the remaining four types.</p></figcaption></figure>

<figure><img src="https://blog.autoforwardtelegram.com/wp-content/uploads/2024/11/chat_source_list_displayed_by_the_selected_type.png" alt="select source for auto forward telegram" height="1024" width="473"><figcaption><p>Chat source list displayed by the selected type</p></figcaption></figure>

#### Troubleshooting Source Selection Issues in Auto Forward Telegram Messages

🚨 **Common issues and solutions:**

* **Synchronization Delays**: If you have recently joined a new chat, the BOT might not have synchronized the data yet, causing the chat not to appear.
* **Incorrect Type Selection**: If the chat isn’t listed, try selecting **“All”** to display all available sources.

💡 **Quick Fix:**

* Click the **Reload** button to refresh the chat list and allow the BOT to synchronize new data.
* **Avoid unnecessary reloads** to prevent delays.

<figure><img src="https://blog.autoforwardtelegram.com/wp-content/uploads/2024/11/button_reload_channel-473x1024.png" alt="troubleshooting source selection telegram bot" height="1024" width="473"><figcaption><p>
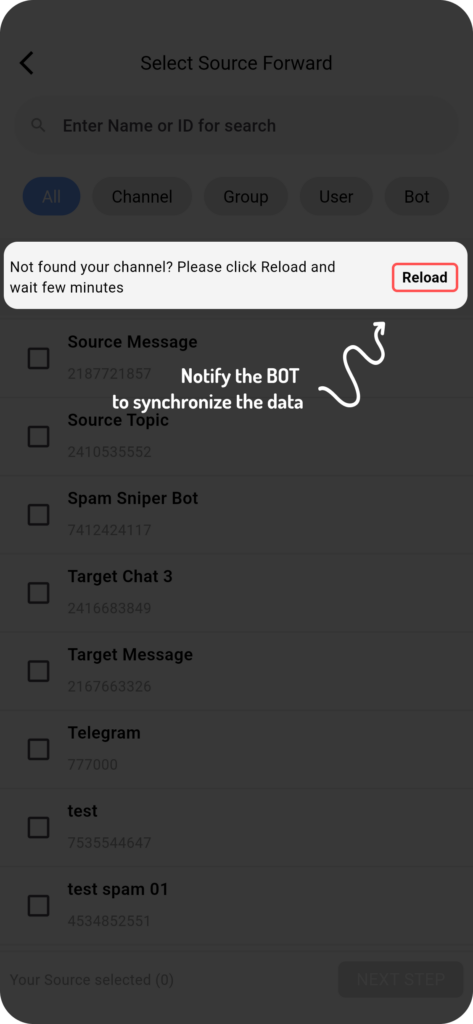
Reload channel button</p></figcaption></figure>

📌 **Note**: Only use the **“Reload”** action when necessary, such as when your Telegram message list exists but is not displayed.

<figure><img src="https://blog.autoforwardtelegram.com/wp-content/uploads/2024/11/reload_channel-473x1024.png" alt="troubleshooting source selection telegram bot"><figcaption><p>The BOT is entering data synchronization mode</p></figcaption></figure>

3. Choose your desired source by tapping the corrresponding item to check it.
4. Once the correct source is located, tap on it to select, then tap **Next Step** to proceed.

<figure><img src="https://blog.autoforwardtelegram.com/wp-content/uploads/2024/11/click_this_button_to_complete_selecting_the_source-473x1024.png" alt="select source for forwarding telegram" height="1024" width="473"><figcaption><p>
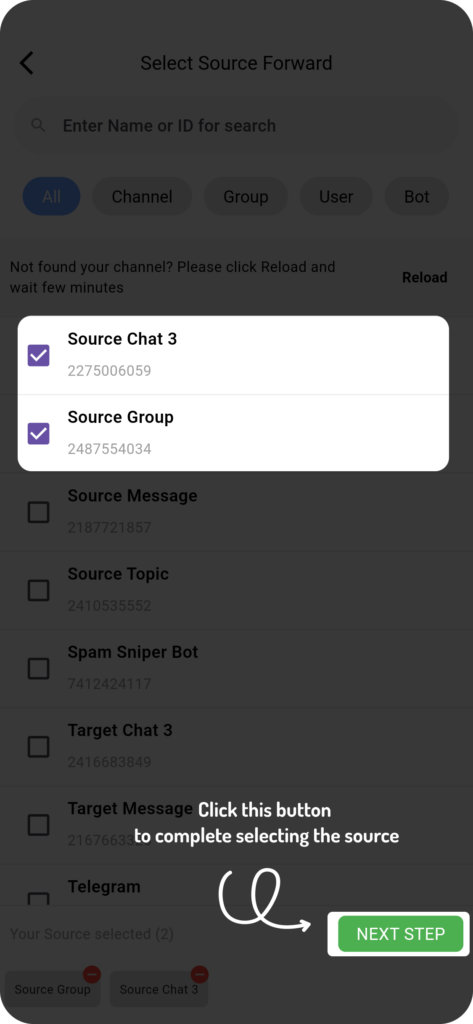
Click the “Next Step” button to proceed to selecting the target</p></figcaption></figure>

### Step 3: Choose Your Target Destination for Auto Forwarding

On the **Select Target Forward** screen, you will define where the messages should be forwarded. The available options include:

* **All**
* **Channel**
* **Group**
* **User**
* **Bot**

📌 **Tip**: Choose the appropriate target to ensure your messages reach the intended audience. After selecting the target, tap **Next Step** to continue.

✅ **Why Choosing the Right Target Matters**

Selecting the right target ensures that messages reach the right audience at the right time. For example, forwarding business updates to a dedicated group improves team coordination, while sending news updates to a channel ensures broad visibility.target, tap **Next Step** to continue.

<figure><img src="https://blog.autoforwardtelegram.com/wp-content/uploads/2024/11/click_this_button_to_complete_selecting_the_target-473x1024.png" alt="select target destination auto forward telegram" height="1024" width="473"><figcaption><p>Click the ‘Next Step’ button to move to the final step</p></figcaption></figure>

### Step 4: Configure Forwarding Task Details

Now, set up the essential parameters for your forwarding task:

✅ **Assign a Task Label**: Enter a meaningful name for your task in the input field.

📝 **Label Naming Rules:**

* Use only Latin letters (‘a’ to ‘z’) and numbers (‘1’ to ‘9’).
* Special characters are not allowed.
* Use underscores (\_) instead of spaces to separate words.

Once all necessary details are verified, tap **Create Task** to finalize the process.

<figure><img src="https://blog.autoforwardtelegram.com/wp-content/uploads/2024/11/enter-the-label-name-and-create-the-task.png" alt="configure forwarding task details telegram" height="1024" width="473"><figcaption><p>
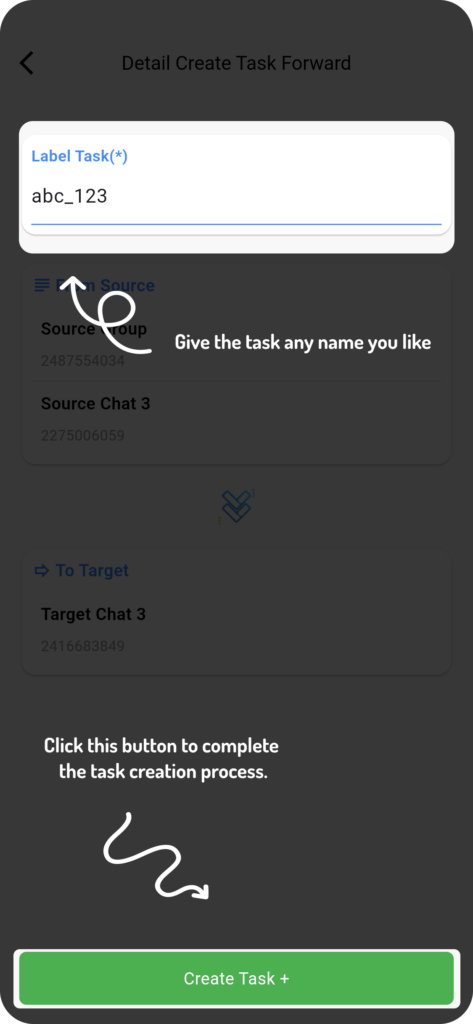
Enter the label name and create the task</p></figcaption></figure>

### **Final: Achieved results**

Your task is now created and activated! 🎉 You can view or manage it from the **Forwarding List** screen.

✅ **Managing Your Auto Forwarding Tasks**

Once created, you can edit, pause, or delete forwarding tasks based on your requirements. Regularly reviewing your tasks ensures optimal performance and prevents unnecessary message forwarding.

<figure><img src="https://blog.autoforwardtelegram.com/wp-content/uploads/2024/11/create_task_achieved_results_2.png" alt="forwarding task created telegram" height="893" width="431"><figcaption><p>Complete</p></figcaption></figure>

### Conclusion: Optimize Your Telegram Forwarding with Auto Forward Telegram Messages

With **Auto Forward Telegram Messages**, you no longer have to waste time forwarding messages manually. By setting up a **Create Forwarding Task in Auto Forward Telegram Messages**, you can streamline communication across multiple channels, groups, and users effortlessly.

***

### **Tips for Best Use of Auto Forward Telegram Messages**

To get the most out of **Auto Forward Telegram Messages**, follow these best practices:

✔️ **Double-check your source and target selections**: Ensuring accuracy will prevent messages from being forwarded incorrectly.

✔️ **Use descriptive task labels**: Clearly named tasks make it easier to manage and identify forwarding rules later.

💡 **Optimize forwarding frequency**: If you are forwarding high-volume messages, adjust settings to avoid unnecessary duplication.

Following these steps simplifies the management of message forwarding tasks, helping you automate your workflow effortlessly.

{% embed url="<https://youtu.be/DSCp3rvKXuE>" %}

***

#### 🎉 You’re Done!

Your auto-forward task is now live. Messages from the source will be forwarded to your selected target automatically.

You can always go back and:

* Add filters
* Enable AI rewrite/translation
* Set up scheduling
* And more…
