> For the complete documentation index, see [llms.txt](https://docs-v2.autoforwardtelegram.com/llms.txt). Markdown versions of documentation pages are available by appending `.md` to page URLs; this page is available as [Markdown](https://docs-v2.autoforwardtelegram.com/forward-to-another-platform/how-to-auto-forward-telegram-to-x.md).
# How to Auto Forward Telegram to X
{% hint style="info" %}
### **Download Mobile App or use Web**
✅ **iOS** → [App Store](https://apps.apple.com/us/app/autoforward-for-telegram/id6447486093)\
✅ **Android** → [Google Play](https://play.google.com/store/apps/details?id=com.autoforward.telegramforward)\
✅ **Web** → [web.autoforwardtelegram.com](https://web.autoforwardtelegram.com/)
{% endhint %}
AutoForward can take new messages from one or more Telegram channels or groups and publish them automatically to an X account. You only need to connect the X account once, create a **Publish Task**, and send a test message.
In AutoForward, this feature is available under **Publish** and is managed through **Publish Tasks**.
### How it works
```
Telegram source(s) → AutoForward Publish Task → X account
```
The Publish Task uses the Telegram sources you select and processes **new messages** after the task is created. Older messages are not automatically reposted.
{% embed url="" %}
### Before you start
Prepare the following:
* An AutoForward account that is signed in and connected to Telegram.
* Access to the Telegram channel or group you want to monitor.
* An active **External Publish** addon. If the addon is not unlocked, AutoForward shows the unlock flow when you select **Publish**.
* The X account that will publish the posts.
* An X App and four OAuth 1.0 credentials from that same App: **Consumer Key**, **Consumer Secret**, **Access Token**, and **Access Token Secret**.
### 1. Prepare your X credentials
The credentials must come from the same X App, and the Access Token must belong to the X account that will publish the posts.
1. Open the [X Developer Console](https://console.x.com/) and sign in with the X account that will publish the posts.
2. Create an App or select an existing App.
1. Open your App's **Settings** and go to **Authentication settings**.
1. Under **App permissions**, select **Read and write**. This permission is required for AutoForward to publish posts.
2. Under **Type of App**, select **Web App, Automated App or Bot** for the automated publishing flow.
3. Under **App info**, complete every required field, including **Callback URI / Redirect URL**, then save the settings. Use the callback or redirect URL configured for your App; do not leave any required field blank.
1. Return to **Apps → select your App → Keys & Tokens**.
2. Under **OAuth 1.0 Keys**, create fresh credentials after saving the settings:
* Next to **Consumer Key**, select **Regenerate** and copy the new **Consumer Key**. Keep the **Consumer Secret** from the same App; if X replaces it during regeneration, copy the new value as well.
* Next to **Access Token**, select **Generate**. Confirm that the token is for the X account that will publish and shows **Read and write**, then copy the **Access Token** and **Access Token Secret**.
1. In AutoForward, enter the four current values: **Consumer Key**, **Consumer Secret**, **Access Token**, and **Access Token Secret**.
If X shows **Regenerate** instead of **Generate**, use **Regenerate** to create a fresh value. A regenerated credential replaces the old one, so update the matching value in AutoForward immediately.
{% hint style="warning" %}
Do not use a **Bearer Token**, **Client ID**, **Client Secret**, or OAuth 2.0 Access Token in place of the four OAuth 1.0 values above. Treat every credential as a password and never share it in screenshots or support messages.
{% endhint %}
### 2. Open Publish
1. Open AutoForward and go to **Home**.
2. Select **Publish**.
3. On the Publish Tasks list, select **Manage Accounts** to open **Platform Accounts**.
4. Select **Add Account**.
If **External Publish** is not active, complete the addon unlock flow and return to **Publish**.
### 3. Connect your X account to AutoForward
In the account form:
1. Under **Select Platform**, choose **X (Twitter)**.
2. Enter an **Account Name**, for example `Brand X`.
3. Enter the four values copied from the X Developer Console:
| AutoForward field | Value to enter |
| ----------------------- | ---------------------------------------------------- |
| **Consumer Key** | The Consumer Key from your X App |
| **Consumer Secret** | The Consumer Secret from your X App |
| **Access Token** | The Access Token for the X account that will publish |
| **Access Token Secret** | The Access Token paired with that Access Token |
4. Select **Save**.
AutoForward verifies the connection. The account is ready when it shows **Connected**. If it is not connected, open the account actions and select **Verify Connection** after checking the four values.
You can also add the account directly from the task wizard by selecting **Add connection** on the **Connection** step.
### 4. Create a Publish Task for X
Return to the Publish Tasks list and select **Create Publish Task**. AutoForward opens a four-step wizard.
#### Step 1 — Choose a provider
1. On the **Provider** step, select **X**.
2. Select **Next**.
#### Step 2 — Choose the X connection
1. On the **Connection** step, select an X account with the **Connected** status.
2. If no account is available, select **Add connection**, enter the credentials, and save them.
3. After the account is verified, select **Next**.
Only connected accounts can be selected for a Publish Task.
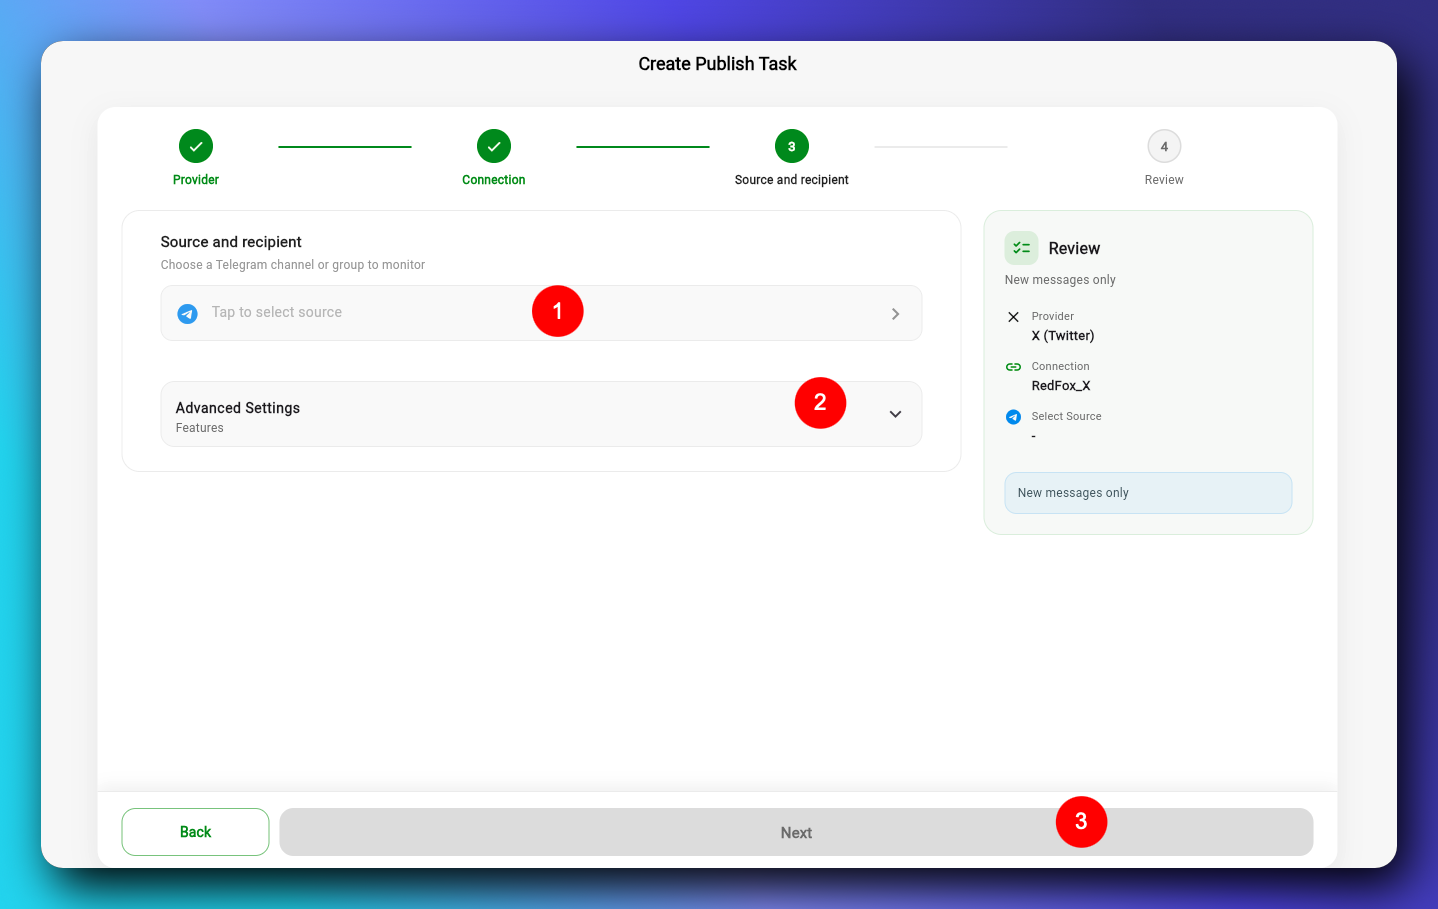
#### Step 3 — Choose Telegram sources
1. On the **Source and recipient** step, select **Tap to select source**.
2. Select one or more Telegram channels or groups to monitor.
3. Check that the selected sources appear in the list.
4. Select **Next**.
For X, you do not need to enter a Channel ID or recipient address. The X account selected on the **Connection** step is the publishing destination.
#### Optional advanced settings
On the source step, open **Advanced Settings** if you want to change how content is handled:
* **Edit**: process changes made to source messages.
* **Delete**: process source message deletion events.
* **Add Header** or **Add Footer**: add fixed text to each post.
* **Auto Post Scheduler**: configure a posting schedule if you do not want to use the default setup.
* **Retry on Rate Limit** and **Skip on Error**: help the task handle X rate limits or individual message errors.
If this is your first setup, you can keep the default options and create the task first. You can edit these options later.
#### Step 4 — Review and create the task
1. On the **Review** step, enter a recognizable **Task Name**, for example `Telegram News to X`.
2. Check the following:
* **Provider**: X.
* **Connection**: the correct X account.
* **Select Source**: the correct Telegram channels or groups.
* **Target**: the selected X account.
* **New messages only**: the task starts processing messages created after the task is created.
3. Select **Create Publish Task**.
### 5. Check that the task is running
After creation, AutoForward opens the Publish Task detail screen.
1. Check that the status is **Running**.
2. Send a harmless test message to one of the selected Telegram sources.
3. Open the X account and confirm that the post appears.
New tasks are created in an active state. If the task shows **Stopped**, select **Start Publish** and send a new test message.
### Manage the Publish Task
#### Edit the task
1. Open the task from the Publish Tasks list.
2. Select the edit icon or **Edit Publish Task**.
3. Change the source, X account, advanced options, or task name.
4. Select **Update**.
#### Stop or start the task
* **Stop Publish**: pauses the task; it does not publish messages while stopped.
* **Start Publish**: starts the task again.
Stopping a task does not remove the connected X account.
#### Delete the task
1. Open the task detail screen.
2. Open the actions menu and select **Delete**.
3. Confirm the deletion.
This removes only the Publish Task from AutoForward. It does not delete the X App or the X account.
#### Update X credentials
If you regenerate a key or token on X, or X reports that a credential is invalid:
1. Open **Publish → Manage Accounts**.
2. Open the X account menu and select **Edit**. On some layouts, the action is shown as **Edit Account**.
3. Enter the new credentials. Secret fields may not be pre-filled.
4. Select **Save** and wait for the **Connected** status.
Do not delete the external X account when you only need to replace its credentials in AutoForward. Deleting the platform account in AutoForward removes only the saved connection; Publish Tasks using that connection may stop working.
### Common statuses
| Status or action | Meaning | What to do |
| ---------------------- | -------------------------------------------------------------------- | ------------------------------------------------------------------------- |
| **Connected** | The X credentials have been verified and can be selected for a task. | Continue creating or running the task. |
| **Verify Connection** | The X account has not completed a successful connection check. | Check the four credentials and select **Verify Connection**. |
| **Running** | The Publish Task is monitoring the source and publishing messages. | Send a new message to test it. |
| **Stopped** | The Publish Task is paused. | Select **Start Publish** to run it again. |
| **Reconnect required** | The connection selected for the task is not ready. | Select **Reconnect connection**, enter new credentials, and verify again. |
### Troubleshooting
#### The X account is not listed on the Connection step
Only accounts with the **Connected** status can be selected. Open **Platform Accounts**, refresh the list, and verify the X account. If it is still missing, confirm that all four values came from the same X App.
#### X reports invalid credentials
Check the following:
1. **Consumer Key** and **Consumer Secret** come from the correct X App.
2. **Access Token** and **Access Token Secret** belong to the X account that should publish.
3. The X App has **Read and write** permission.
4. You did not paste a Bearer Token, Client ID, Client Secret, or OAuth 2.0 Access Token by mistake.
5. If you changed permissions or regenerated a credential, update the Access Token pair in AutoForward.
#### The task was created but no post appears on X
1. Check that the task status is **Running**.
2. Send a new message after the task was created; older messages are not automatically reposted.
3. Confirm that the message was sent to one of the selected Telegram sources.
4. Check that the X account still shows **Connected**.
5. Confirm that the X App still has posting permission and access to the required API.
#### The task was stopped and needs to run again
Open the task detail screen, select **Start Publish**, wait for the status to change to **Running**, and send a new test message.
### Frequently asked questions
#### Can one task monitor multiple Telegram sources?
Yes. On the **Source and recipient** step, you can select multiple Telegram channels or groups in the same Publish Task.
#### Does AutoForward repost messages that existed before the task was created?
No. This flow starts with new messages after the task is created. Edits or deletion events are processed only when the corresponding options are enabled in **Advanced Settings**.
#### Does stopping a task remove the X account?
No. **Stop Publish** pauses only the task. The X connection remains saved under **Platform Accounts**.
#### Does deleting a task delete the X App?
No. Deleting a task removes only the Publish Task configuration in AutoForward. The external X App and X account are not deleted.